#i don't think i'm doing photoshop right haha
Explore tagged Tumblr posts
Text

despite everything, it's still you
#kamal#yes it's an undertale quote#i'm annoyed it looks so grainy#i don't think i'm doing photoshop right haha#falling through
11 notes
·
View notes
Text
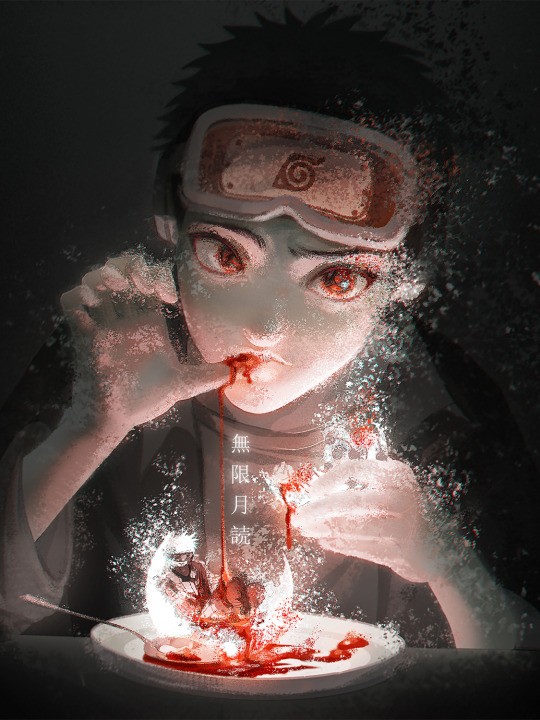
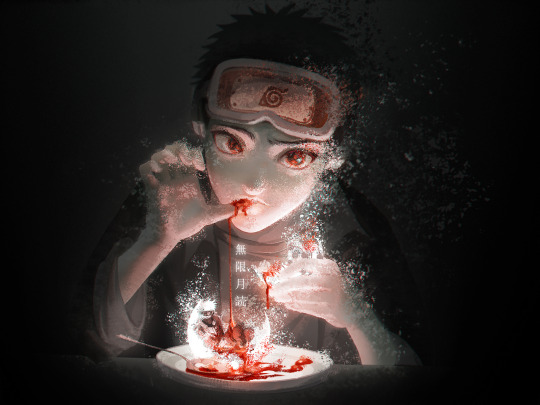
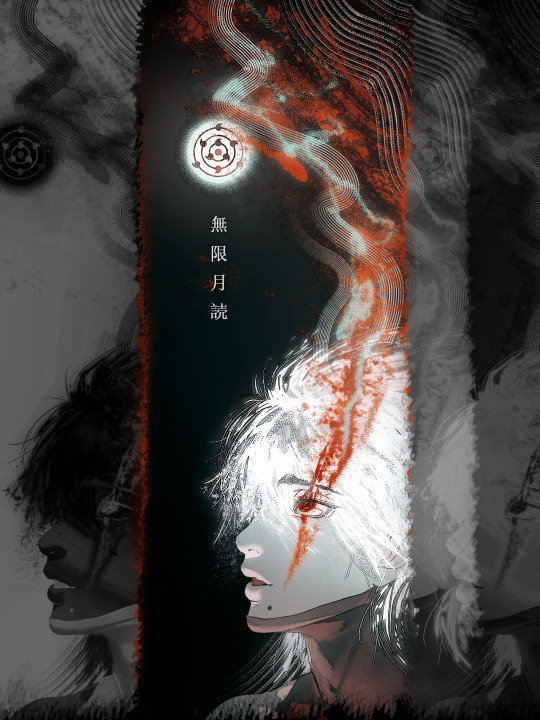
Please zoom in to see small Kakashi! 😭 He kinda disappeared 😭😭😭
Text translation: "Infinite Tsukuyomi" (無限月読)
Drew these in mid-July - when I started doing digital again actually 🤔
Took inspo from the Balut - a street food in my country; I hear a lot of people are grossed out by it?? Don't know if this is controversial, but I personally love the dish. Essentially grew up with it after all!
Wanted to draw something that feels a bit creepy but still has a sense of mysticality to it???
Meh, don't know if the feeling got across or not
I thought since Halloween is coming up, might as well post this haha
About the process of drawing these!
These were very fun to draw! I messed around a lot with photoshop to achieve this glowy dusty effect?? From the brushes to the blending options, and maaan the filter gallery 😭😭 Such fun tools to play with.
The main brush I used to achieve the dusty effect is called "KYLE Bonus Chunky Charcoal", in the Kyle Dry Media brush set. If you can, I recommend checking it out! There are definitely other ways to achieve this sort of effect, though. You can probably just use some sort of scatter texture brush and it'd work just fine. Studying is all about trying things out, right? This is like my first experiment with this type of effect, and I was happy at the time. Now looking back, these could most definitely turn out better, no? I really went overboard with just the effect and forgot everything else. The blood and the plate looks horrible man. If you look closely, you can see the sketch lines haha! I got lazy!
Also, for Obito's pose, I relied heavily on a reference I found on pinterest 😭 I wish I'd changed the pose more tbh, it looks really boring.
And I gotta say, these just look underwhelming in this smaller size. Like reaaaaaally underwhelming. Would love to show you the big version, but oh well! 😭😭😭
Brain vomit time!
I love the prospect (??? is that the right word) of Obito being all god-like and powerful after Tsukuyomi, having control over everybody's dream worlds?? And like he jumps from dream to dream, but stops at Kakashi's and picks it apart???? Observing and tormenting Kakashi with his childhood form that has both sharingan???????
Kakashi would probably be confused with Obito's appearance at first, asking questions like "What are you up to this time, Obito?", but then wouldn't receive any answers??? Like little man would just stare at him creepily, and Kakashi would push this to the back of his mind for a while???
Umm below is the technical stuff, I guess??
My headcanon is that the time span in the dream world is the same as the real world. Meaning, 30 years in the dream world feel incredibly real, with no gap of memories. It's essentially a different timeline. Whether this makes sense or not, who knows haha!
Let's talk about the dream events and how they affect Kakashi! Due to Sakumo and team Minato still living, this Kakashi probably wouldn't be as lax nor sad as in canon?? The relationships and personalities would be different huh???? I'm having a headache thinking about this, so let's just say that: 1. Sakumo lived because the villagers weren't as harsh, but the animosity still remained. Kakashi still developed this obsession with rules, but he doesn't blame his dad as much. 2. Kannabi happened, Kakashi was given the sharingan, along with Obito's ninja way. Team Minato thought that Obito died for a while, but Obito is 'rescued' by Madara, same as canon. 3. Rin would still be targeted by Madara, but Obito came in time to help with the situation, blocking Kakashi's chidori from connecting with Rin's chest, but also knocking Kakashi away. Then, a Mist enemy took advantage of the situation to attack Kakashi, injuring him gravely, to the point where everybody thought he died. With this, Obito activated his Mangekyou and exploded on the Mist enemies, killing them all. Meanwhile, Rin tried to heal Kakashi, just barely saving him. As Obito had dealt with the enemies, there was no need to rush back to the village, and the Sanbi wouldn't be released till then. And so, they waited for Minato to come and help with Rin's seal. (About Obito's Mangekyou activating with Kakashi's death - would that be too far-fetched? My reasoning is that Obito would think that it was his fault Kakashi died, because it was Obito who knocked Kakashi away into the enemy, no?) 4. Because there's no one to become 'Madara' now that Obito came back to the village, Naruto is born, Minato and Kushina live.
5. The Uchiha massacre doesn't happen.
(Everything is incredibly convenient, because I don't have the brain power to make it otherwise, please help 😭😭) -> In conclusion, this Kakashi resembles the Kakashi of the real world, but less depressed and self-destructive??? He loves his living comrades. My man still has a massive obsession (more like crush lol) with Obito by the way, just like in canon. He just doesn't show it.
-> About Obito of the dream world (I'mma call him Dreambito), he is all sunshine and brightness, but he exhibits some dark thoughts and deep rage from time to time due to the residual effects of Madara's seal on his heart. The seal has been removed though. And he has this obsession with Kakashi's safety, as he almost pushed him to his death once, albeit accidentally.
-> I was debating whether to just start this dream world at the point where Obito got crushed, or to start it at the beginning of Kakashi's life. In the end, I went with the latter, cuz ya know, I like the idea of Kakashi living through a whole life all over again, just to finally come to the realization that it's all a dream. Does that make any sense at all??
Obito (child form - 13) first appears in front of Kakashi at the start of the Naruto series, when Kakashi has officially become the teacher of team 7. (Let's not change this okay, my brain would fry haha I'm not gonna deny that the idea of Obito and Kakashi becoming co-teachers of team 7 isn't incredibly fun though)
After the first encounter with this child Obito, Kakashi begins to have flashes of memories from the real world, and he hallucinates about people's deaths - mostly about the members of team Minato. This young Obito is always in the corner of his vision, most of the time silent, sometimes saying things like "You trash" to Kakashi whenever he encounters Rin, who is whole and grown up in this world.
Kakashi exhibits more destructive behaviors as this goes on, the line between the dream events and the real events slowly blurring. He takes more dangerous solo missions out of the village, and shows strong signs of PTSD, just like in canon.
The two Obitos would contrast each other?? Like Dreambito would be all concerned with Kakashi's decline in health (both mental and physical) and goes to confront and comfort him, many times over because that's how it is with them??? Dreambito might even move in with Kakashi, being the obsessive and protective Uchiha that he is. Meanwhile young Obito would be an absolute asshole, saying all these horrible things to poison Kakashi's mind haha
At this point, Dreambito'd be in the last stage on the journey of becoming Hokage, gaining the all the trust from the Uchiha clan, the village elders and the villagers as a whole. I don't know about Rin, though? Should she be romantically involved with Dreambito or no? Would Kakashi dream that??
I think Kakashi's dream would somewhat focus more on Dreambito being happy and satisfied, to be honest. I know there's Sakumo and team Minato as a whole, but as a degenerate shipper, I love the obsession between them🥺
I don't think Obito would directly interfere with what Kakashi is dreaming about, i.e. changing Dreambito's behavior, or like the political situation of the villages (?). But he would most definitely insert himself in Kakashi's psyche, no? Mess it up real good.
Kakashi would slowly realize that he is living a dream world, after all the flashes of memories that Obito generates in his mind. He would most definitely deny it at first though, I think? And then it would reach a point where Kakashi remembers everything from the real world, but he has also lived through 30 something years of the dream world, meaning he'd be in his 60s?? Does that make sense or no?
And so, while Kakashi now knows that everything is a dream, his feelings for everybody in the dream are real. If that's the case, is it really that important anymore that he escapes the Tsukuyomi? Can this dream world really be called fake at this point? Is there even anything in the real world for him to return to?
What's to say 'the real world' isn't a dream at this point?
-> Kakashi would completely close in on himself after this. He still does things that he would normally do, but it'd be all an act. He would feel completely isolated.
-> Dreambito would notice and confront him again, now that they live in the same house??? Kakashi would like say everything is fine and try to act more convincingly, but Dreambito would still know something's wrong????
-> Obito is observing from afar, who knows what his motivation is at this point.
Because this is Kakashi's dream world, I suppose he would have the power to change this world to his will, now that he's aware? This is like a lucid dream situation???
The people in the dream have their own will up until this point, but Kakashi can somewhat change their behavior if he really wants to, whether it's subconsciously or not??? Example: He can probably will Dreambito to kiss him or something lol
So on and so forth!
Man, I'm having waaay too much fun imagining the pain. There are probably like a thousand things that doesn't make sense haha! I do wonder how this sort of storyline should end though, does anybody have any ideas? Personally, I prefer slow burn with a (sort of) happy ending, but ya know, angst all the way is good too! I can't write, but I love thinking about all the things that could happen 😭😭 English isn't my first language, so this might have felt weird to read at some point haha
If anybody wants to develop this, please feel free to do so! And if you've read this far, thank you for reading this absolute brain vomit of mine! I love to yap, as you can tell haha Have a good day!
#naruto#naruto fanart#obito uchiha#kakashi hatake#オビト#カカシ#obito x kakashi#obkk#obikaka#man i am gonna cringe so hard reading this back#but hey i had lots of fun getting all of this out#so it's all good!#don't have a proper halloween here but#meh whatever#happy halloween!#even though it's like way too soon!
360 notes
·
View notes
Note
Several things: -LOVE your art, it’s amazing! Especially the one with Crowley and Aziraphale under the umbrella - which software do you use? Your art always look SO gorgeous (cheeky quote from GO right there lol) - how did you get so good at drawing?And thank you for encouraging other people to keep drawing and being so kind as I sometimes can’t help but compare my sketches to others and feel silly, but I guess it’s just a learning curve… Thank you so much for bringing your art to the world!😊
Thank you so much!!
I use Clip Studio Paint for drawing and Photoshop for small adjustments!
2. Haha thanks! Honestly...it's the hyperfixations. I managed to improve a lot in just a year because I've been drawing SO much cos there's so many shows and movies I became obsessed with that I wanted to create art for. So by drawing a lot I just naturally improved. For example these two Illustrations are just a year apart:
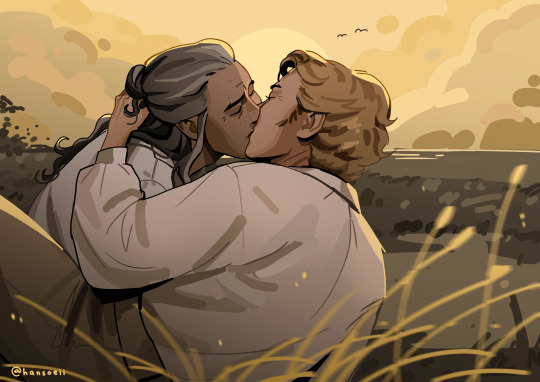
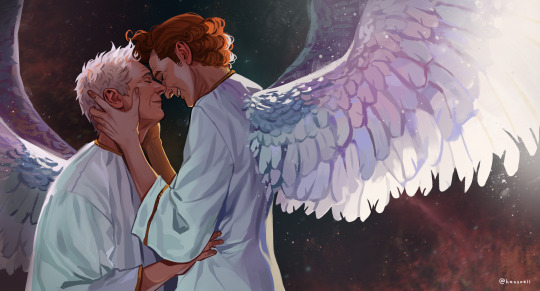
I actually didn't actively try to improve, it's been a while since I did proper studies (I just don't really have the time for it between freelancing and art school), it just happened.
But I can absoluetly recommend going on YouTube and look for some art tutorials if you actively want to start improving! There's some channels that helped me so much back then:
moderndayjames
Incredible shape language and super insightful tutorials on all kinds of topics! I learned so much from him.
Ahmed Aldoori
So many awesome tutorials on so many different areas of art. Love it.
Marco Bucci
Incredible tutorials on color theory and understanding how color works in general! Learned SO much from him!
Sinix Design
The OG tutorials I began learning from. I watched his videos religiously as a teen. I adore his painterly style and adopted it in some way, haha.
Ethan Becker
This dude sometimes drops these tiny art tips that just completely blow my mind and that I adopt immedietly. He's super entertaining but also such a great teacher.
And I can also recommend checking out this book by James Gurney if you want to get better at colors!
And for anatomy I highly recommend the Morpho books!
But improvement doesn't only come from drawing a lot. A lot of the time I don't draw for a while and just study the world and artists around me and suddenly I improved when I get back to drawing. Don't ever overwork yourself to the point that you don't enjoy what you do anymore. Take breaks and listen to your body!
I learned to try and not compare myself to other artists, which helped a lot. Through conventions and social media I made so many lovely artist friends and realized how we're all struggling in a very similar way. A lot of us don't even really know what we're doing most of the time, haha. But we help each other out, it's such a wonderful community. I think when you're not actively part of the community it tends to feel like other, more successful artists are some kind of art gods that have perfected the craft and never struggle. But believe me, all the artists you admire go through rough times all. the. time. Sometimes what they do feels easy and natural, other times (more often than not) it feels like you have to try and learn how to walk all over again and you start to doubt your abilities. I personally go through that so many times.
So what I'm trying to say is that instead of comparing yourself to the artists you admire, learn from them instead. Ask questions, befriend fellow artists, study the artists you enjoy and just have fun with it!
And finally I thought it would be fun to share some of my horrendous Johnlock fanart from a decade ago for some motivation:
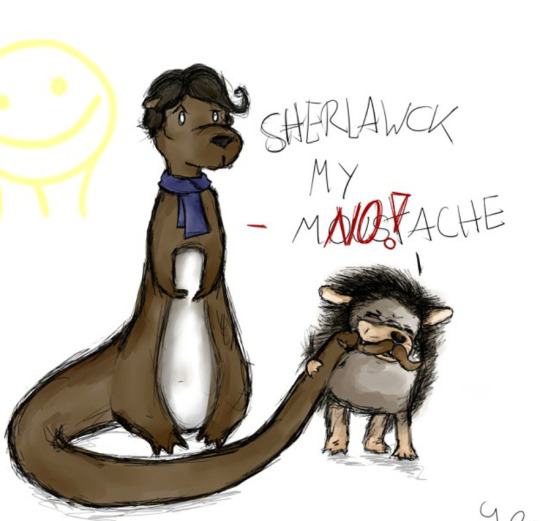
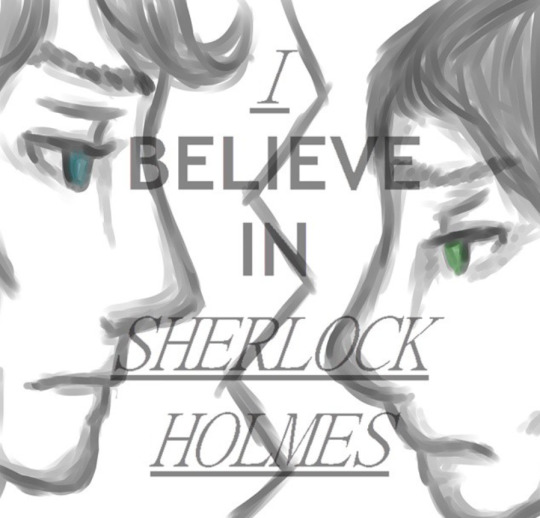

I hope my answer didn't overwhelm you, but I thoight it would be nice to give a more detailed answer!
Have a wonderful day and keep drawing! :)
473 notes
·
View notes
Note
You use procreate right? I'm a beginner in coloring. And your lighting and color is always so good. If you had like steps/tutorial/tips on coloring/lighting in procreate. I would pay for it even. It's hard to find a good tutorial on YouTube for procreate users, and the style that you do which is similar to the coloring style I've been trying to self teach myself for a while and failing. Anyways sorry if this is a weird ask, but I would honestly really appreciate it
One speedpaint coming right up!
Nothing weird about this question. Honestly, I struggle a lot as well, but my problem is the shape, not the colors. I suppose I can "feel" colors, that's why impressionists are my favourite (classics always help!)
I don't know if I can help with using procreate, because I'm not really savvy with it, I always use photoshop for more complex work as it is perfect for twicking lighting, changing tint etc. I prefer to sketch in procreate, because, a) it has many great default brushes, b) my back hurts from sitting on my pc, c) I can go anywhere, draw and immediately post it.
I’ll try to summarise what I figured out with procreate, and maybe give a few tips. But I don’t know if that’s the best way to use this tool. I’m just… winging it, haha
First, if you struggle with colors, look up the color circle
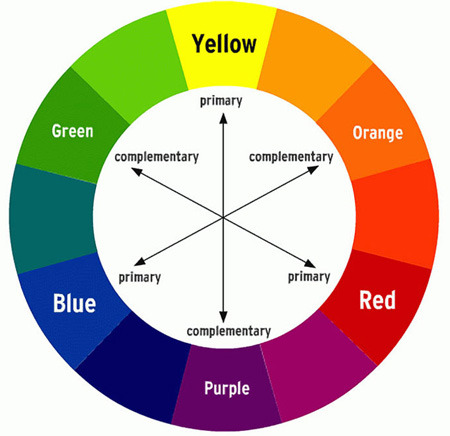
It shows exactly which color goes best with which. For example, if you use Orange for your lighting, and Blue for your shadows, it’ll look nice. Perfect, even. I love that one. Avoid using pure black for shadows, otherwise you risk to make it too… burned? Like, dirty. Be careful with Black magic.
I’ll use Zevlor here to show how it works.
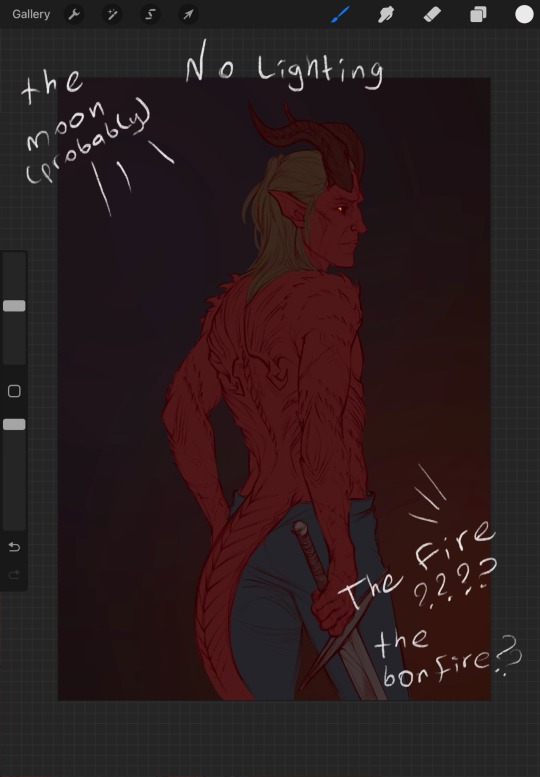
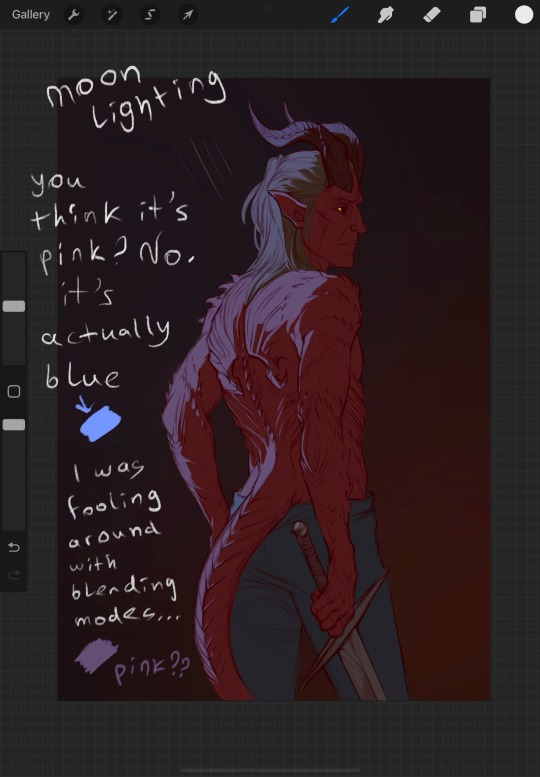
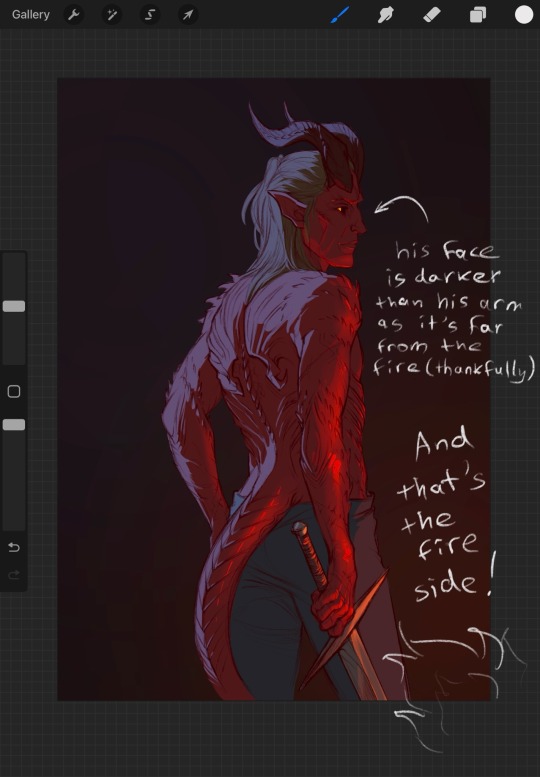
In addition, you can use the opposite color to make the character stand out. It’s really important. What’s more noticeable, red on brown or blue on brown?
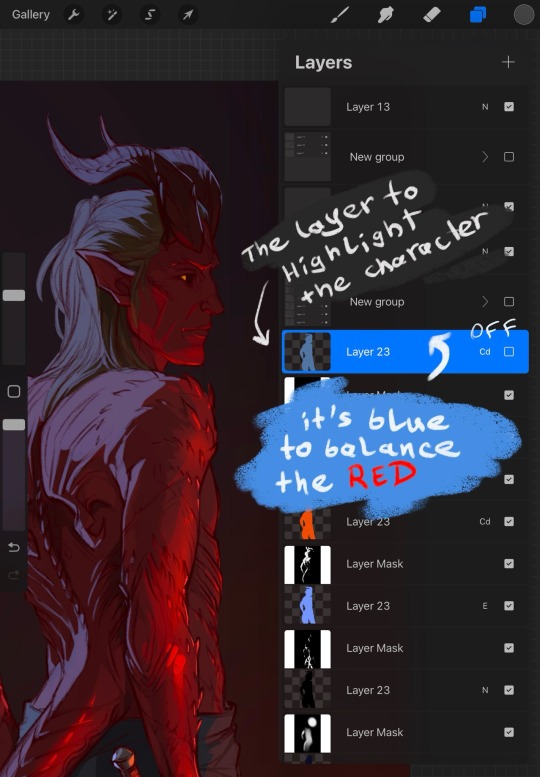
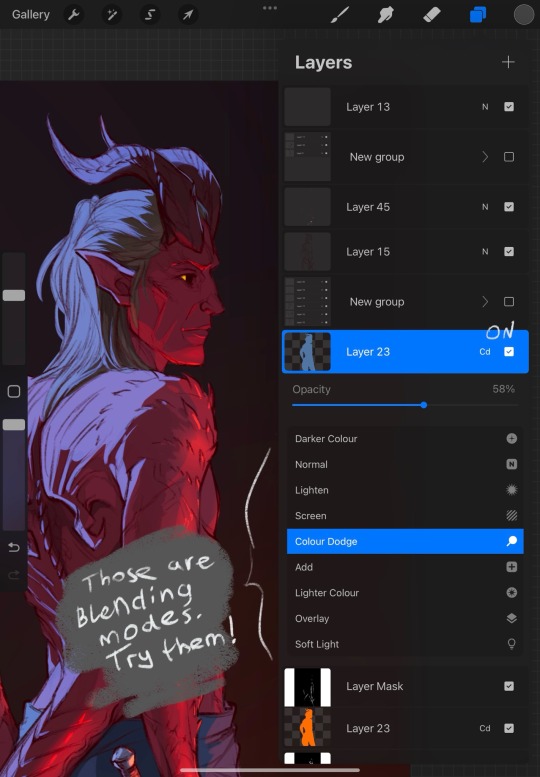
Also, learn to use masks. Really, they may be scary, but it saves SO MUCH time. Specifically with procreate, I always use them now for everything because I haven’t found the better way to avoid fixing the stray lines. With that solution, you'll need to correct only one layer at the start, the main one. Clipping masks are great to help with that, but procreate is a little uncomfortable in that regard. I’ll show what I do, perhaps it’ll make things clearer
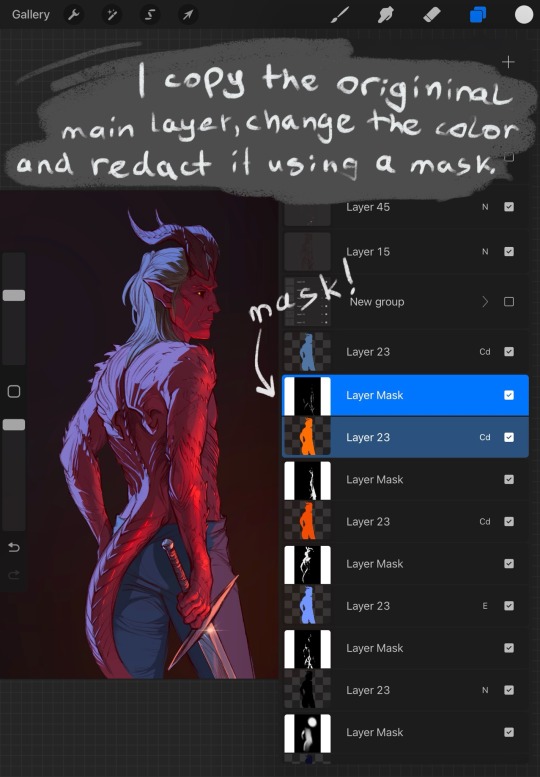
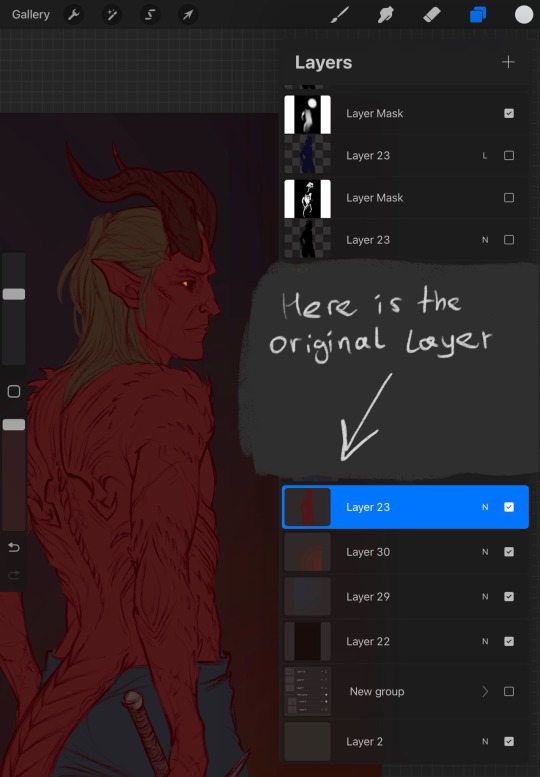
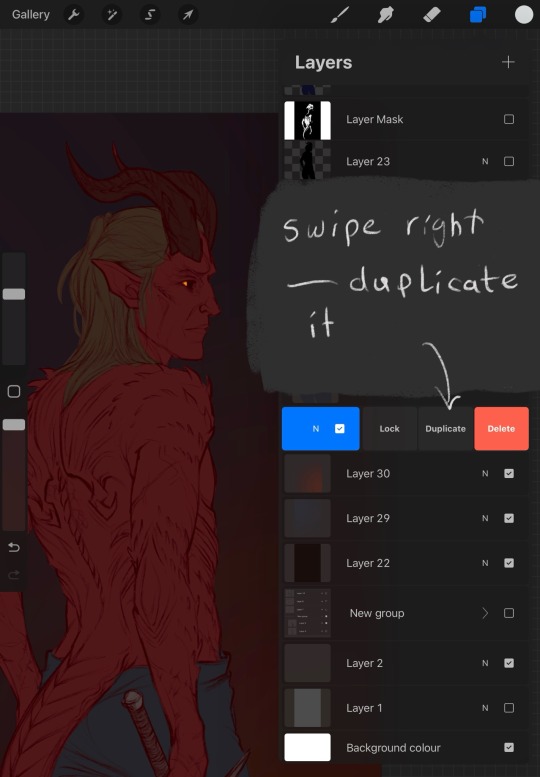
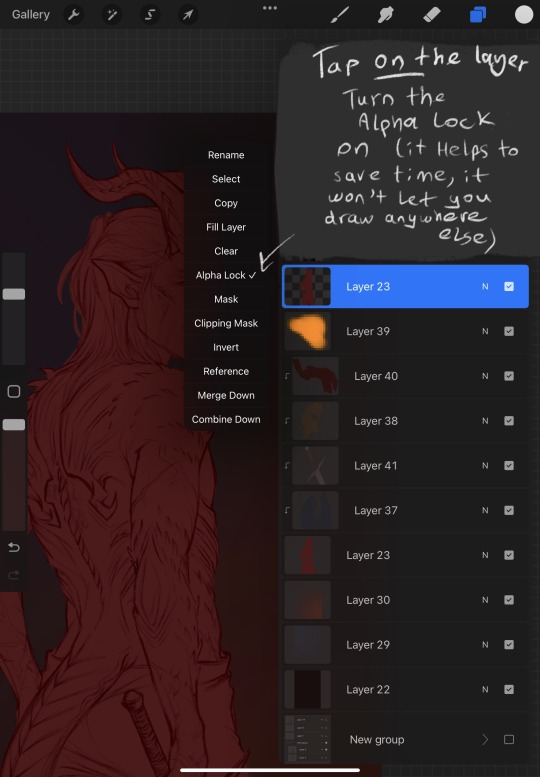
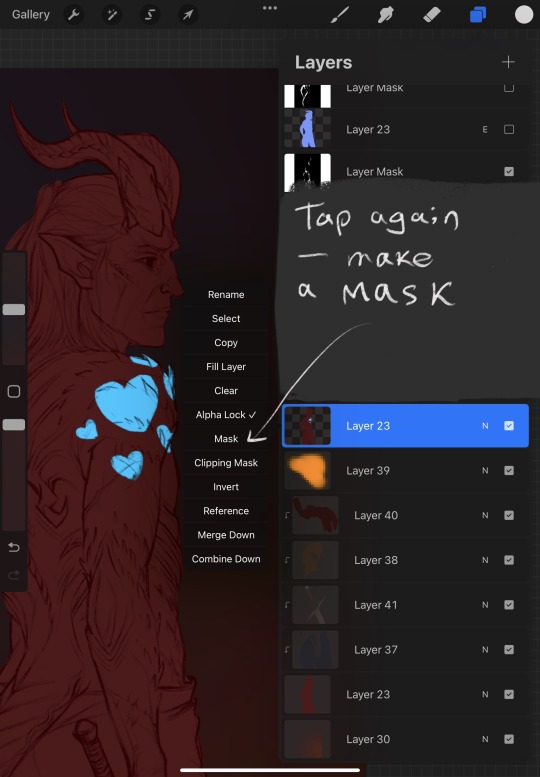
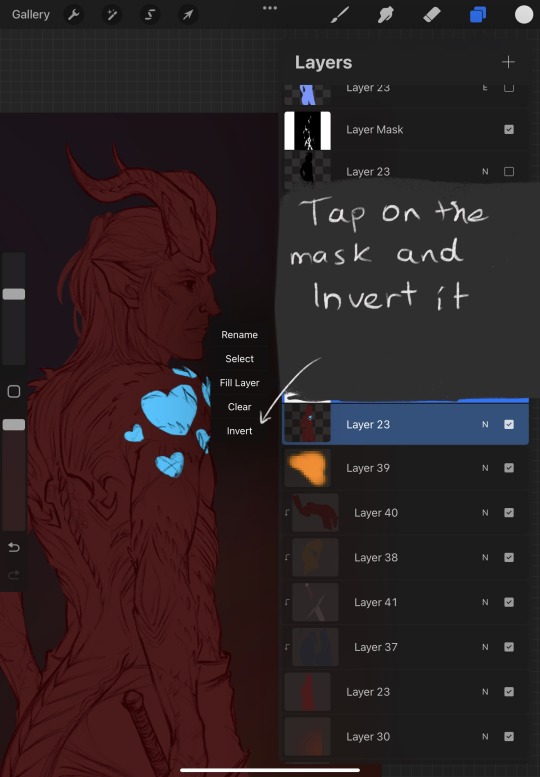
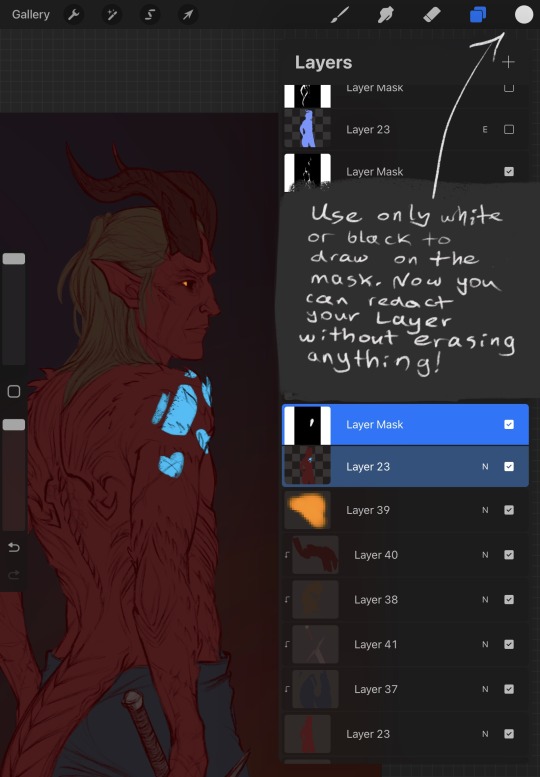
Those are the most useful things to know, I think. Masks can be used in photoshop in the same way, I have a bad habit of creating too many of them so it's crouded. And they rarely have a name. I'm too lazy to name them all
Anyway, I hope I managed to answer at least one of your questions... or not X) I tried. Good luck with exploring Procreate!
126 notes
·
View notes
Note
Hello ! I saw your fanart, and I absolutely adore it ! Can I ask how you manage to give that rice paper texture to it ? I looked for transparent textures on the internet and I kinda lost my mind doing so haha ;;
Is it a brush maybe...?
Thank you in advance ! 🌸
Hi, I'm so glad you like the art! I've done the rice paper texture a couple different ways, usually involving layers in Photoshop with transparencies applied. Here's what I did for this one:
I used this free rice paper image, which I found online a while ago:

I dropped the rice paper image onto a new layer on top of everything else. Since I wanted the fibers to be smaller (and also wanted the final image to be high resolution), I shrunk the rice paper image down and then duplicated it and made a big patchwork that covered the image.

(I think I made the copies smaller than this originally, but this is just to demonstrate the process I used.)
I flipped the copies around here and there to create more variation in the final texture.
When the patchwork covered the image, I merged all the separate rice paper copies onto one layer.

The patchwork wasn't exactly seamless, which was fine because I wasn't going for uniformity.
I used the spot healing brush tool and clicked and dragged it all over the seams and other parts of the patchwork to smooth it out and randomize the texture.

(What I ended up with was a bit less "bumpy"-looking than this example, probably because I copied the rice paper image at a smaller size.)
I then... pretty much just screwed around with the rice paper layer's darkness, transparency type, and opacity until I found a combination that looked right. No two texture/artwork situations are alike, so I end up experimenting a lot.
In the end, I had two rice paper layers, one with a "soft light" transparency at 85% opacity and one on top of it with a "color burn" transparency at 50%. I put them inside a layer group and then adjusted a little further by bringing the group's opacity down to 55%:

It looks like I also darkened the texture itself at one point, probably by duplicating the original layer, applying a "multiply" transparency to the new one, and then merging them again. In any case, it got darker, and unfortunately I don't recall exactly how. :p
My goal was to make the texture evident but still subtle, and to keep it from interfering too much with the colors underneath it, and I pretty much just kept tweaking things until I had that look.
In short, my best advice is to find an image that looks more or less like the texture you're going for, drop it into Photoshop on top of your artwork, modify it in whatever way will bring it closer to the result you want, and then experiment with layer transparencies until it looks right. I usually end up with one layer that lightens the colors and another layer that darkens them, which helps bring out the fibers without making everything else too dark.
(Another trick that sometimes works is to invert the colors on the texture to make the overall texture darker. This can give you some more cool options for experimenting with transparencies. Here's an inverted version of the texture above, which I've used in a couple other pieces:)

I really hope that's helpful. Have fun! :)
30 notes
·
View notes
Note
hi lovely!! do you have any tips on making cool fun and sexy typography?
hey joanna!! this made me giggle haha, i'm not quiiiite sure how to answer that, but here are some tips i keep in my when i do typography, and some examples:
FONTS
don't be afraid to "shop" for fonts and try funky fonts you've never used/seen. i often try so many before settling. i almost always use at least 2 different font for gifsets, even 3 sometimes. i think a good font pairing can do a lot for a gif. it's usually something like:
serif + cursive/funky fonts (example)
sans serif + cursive/funky fonts (example)
serif + sans serif fonts (example)
two different cursive/funky fonts (example)
or even simply the same font but all caps + all lowercase (example)
in case you're unsure where too start or want inspiration, here's a great resource: usergif's font pairing guide and its fonts page
BLEND MODES & LAYER STYLES
i think playing around with different blend modes and layer styles will always elevate your typography game, in my opinion. it's usually a bit more dynamic than just an opaque color. tho this minimalist typography can also be really good.
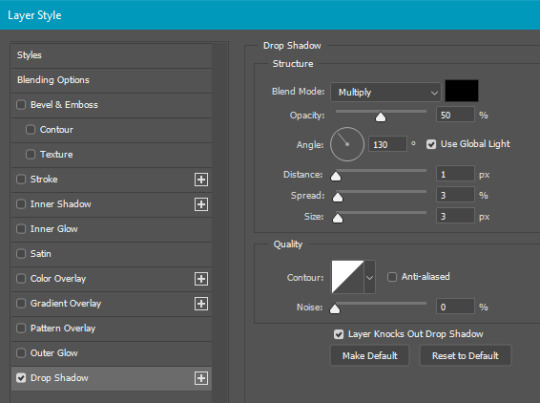
when you double click on a text layer, you get all the layer style options, as well as the blend modes. a very popular layer style is setting the layer's blending option to difference, paired with a color and/or gradient overlay (often set to multiply/color dodge). a drop shadow is also important so the text is more easily readable. we often see a black soft drop shadow, but don't hesitate to be creative with it, for example a thick, hard line, colorful drop shadow.
i feel like this step often takes the most time for me because the possibilities are endless. definitely play around with layer styles, especially drop shadow, color overlay, gradient overlay, stroke. and also try different blending modes for these settings.
as for the layer's blend mode, also definitely play around with them. and keep in mind that the text's color will also give a different result, it doesn't have to be white + blend mode set to difference, even tho this is a classic that works well.
TEXT WRAPING & POSITION
a great feature on photoshop is definitely the text warping tool. to access it, right click on a text layer and go "warp text". from there you'll get a few different styles and setting sliders. my favorites are flag and wave (example). you can always go back to edit these settings once they're done by right clicking again. and you can even keyframe/animate these settings!
typography doesn't always have to be centered and straight, i often prefer it on a side and rotated a little. you can easily rotate typography by selecting the layer(s) and hitting ctrl + T. you can also play with the skew and pespective after hitting ctrl + T by right clicking the canvas and clicking on either. these will give different ways to move your text.
SIZING
i love playing around with different font sizes, it makes the typography more interesting in my opinion, and it's a way to emphasize some words.
so for that reason i usually put each word on a different layer so i can edit each word separately. sometimes i will also put each letter on a different layer, because it can be interesting to offset/rotate some letters sometimes (example) (another example).
i often pair a quite small serif or sans serif font with a much bigger funky font (example). and often that bigger font will also have different sized words (example). i play around a lot with this!
ADDED EFFECTS
there are some things than can be done to enhance typography:
adding a colorful rectangle block behind the text (example)
using text symbols such as quotation marks or backets (example)
using lines around the text (example) (another example)
these can definitely bring typography to a different level
MORE RESOURCES
great font website
usergif's typography tag
my fonts tag
this is all i can think of right now, i hope it helps :D if you have any question on a specific text effect let me know, i can definitely make a tutorial!
#alie replies#silversmists#typography#photoshop#*ps help#resource#completeresources#allresources#resourcemarket#usercats#userabs#userpjo
214 notes
·
View notes
Text
so hold my hand (consign me not to darkness) [1/4]
Ah, yes. The fic that made me realise I’m in desperate need of Cursed Spirit Gojou in my ever-growing favourite GoYuu tropes.
Content Warning!
Major Character Death. Other characters are disrespectful to the corpse.
I highly suggest you read the fic first, or just the fic, since I don’t think I was properly able to adapt it into drawings. While I managed to use roughly two weeks of on-and-off planning, researching, and storyboarding, I only had a full week to finish it. You can read more of my thoughts below the comic if you’re curious.
Title: so hold my hand (consign me not to darkness)
Author: qalb_al_louz
It’s ongoing, and as of this drawing, the fic is in its third chapter. While this is (sexually) SFW, always be mindful of the tags! Please keep yourself safe and sound.
Please read from right to left, and enjoy!
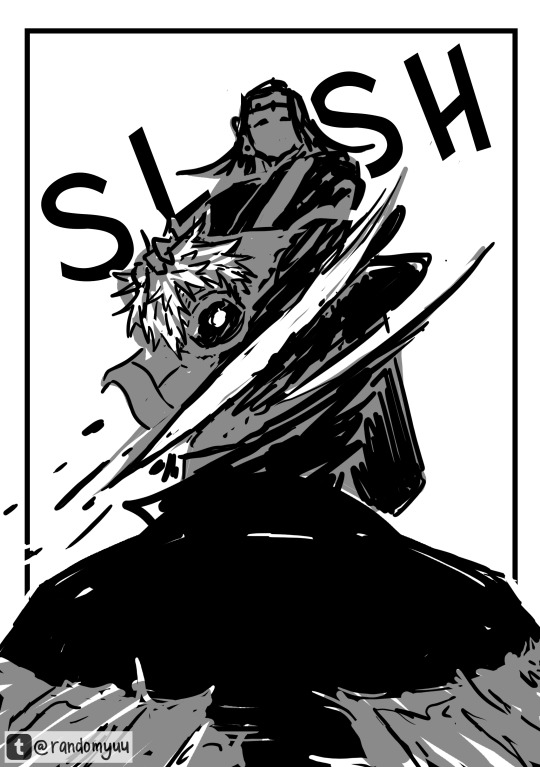
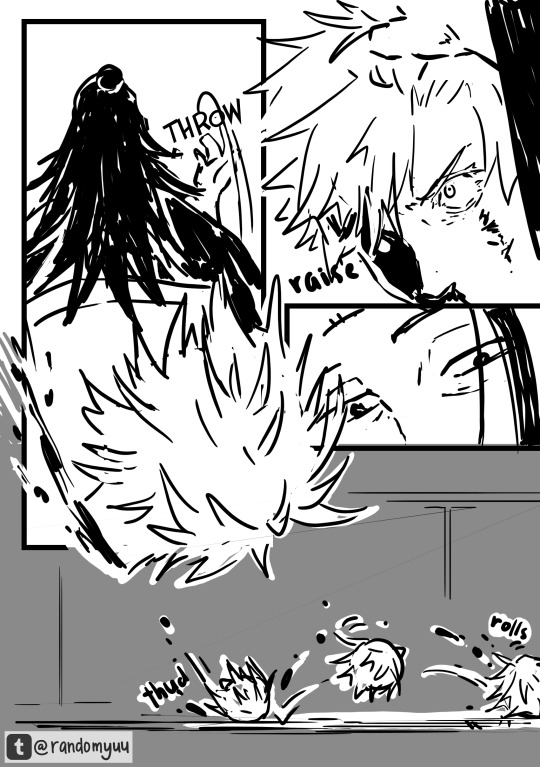


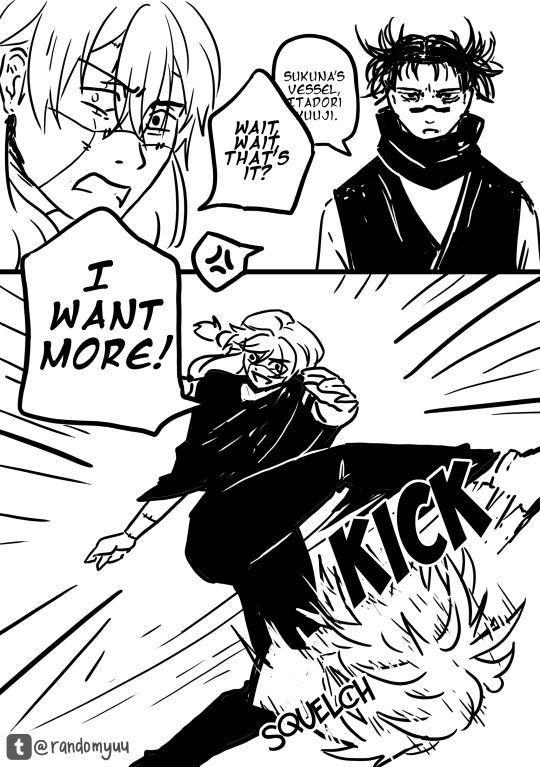


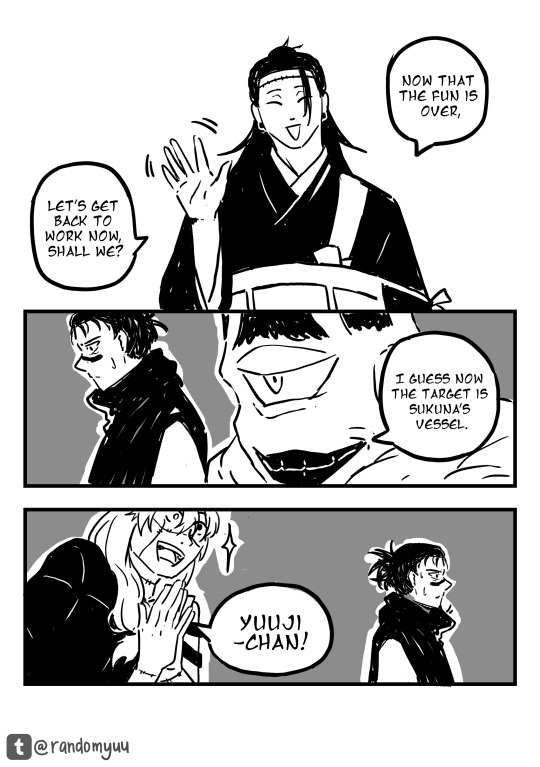
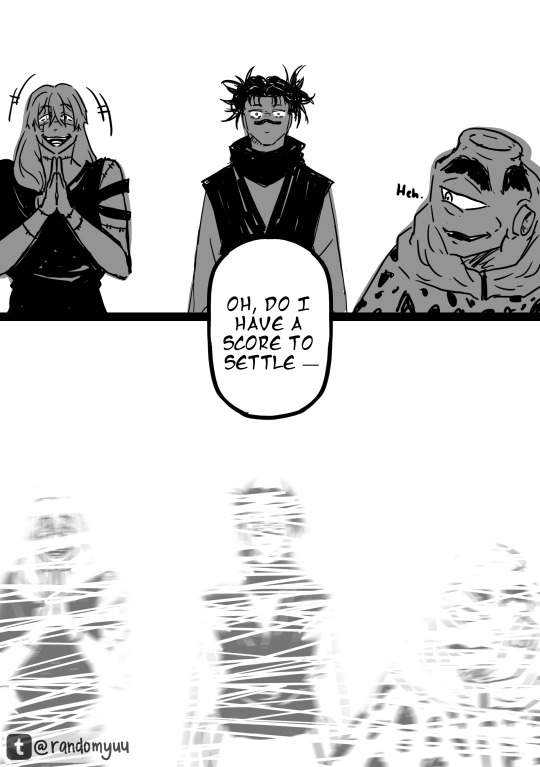
You can only upload 30 images in one post, huh Damn, I gotta divide it into parts
Part 1 | Part 2 | Part 3 | Part 4
Alrighty, I'll put my watered down unhinged thoughts below. No extra drawings down there if you're curious haha (unless you want to see the storyboard and the characters' full body character sheet, lemme know). You can skip the stuff underneath the Keep Reading for all parts.
This fic had me grinning from ear to ear every time I read this. The atmosphere, how it goes from POV to POV—of pure fear and panic—and the peak excitement I got when Yuuji properly meets Gojou, like brooooo 😭
Gosh I cannot emphasise how much I love this fic. I’ve always been wanting to make a whole comic out of it, especially since it was 2 chapters and it doesn’t look like the author will update it, but it just… kind of forgotten ∠( ᐛ 」∠)_
But then the author posted a new chapter and I told myself this is a sign I should really start.
also goddamn I was so naive to think I can tackle 2 chapters as comic—no I was in fact cannot
The moment I laid my eyes on the first paragraph, things were portrayed very vividly in my mind. The panel, the angle, Gojou's head rolling down... I was like, hell yeah. Then I continued reading and I finally succumbed to my desire to draw this out.
At first I want to adapt this into a vertical format like those manhwas. However the longer I try to learn and storyboard it... I am simply not yet comfortable with it, especially for such a big project. Even the 1st storyboard starts vaguely vertical before the panels quickly crammed into that B4-B5 format lol. The first sketch estimated 69 (heh) pages for 90% of chapter 1. I said "no" for my own sanity and fully focused on the usual manga format and it was narrowed down to 60. Still a lot though, quantity and time-wise. So with a heavy heart, I can only do the majority of chapter 1 :”) I really really want to draw Sukuna talks back to Gojou—do you have any idea how good that scene was??? Gojou tried so hard to restrain himself, he’s so other I love him 😭
Due to the sheer length of this comic (I'm still in disbelief), I have limit lots of things, and that includes the drawing. If you've seen my other JJK fanarts, they are more rendered than this one. Well, this one is purely sketched with the help of the eraser to tidy up some lines. This is also the first fanart that I did purely on Photoshop, so I can control the typesets and drawings in one place. Usually, I use Photoshop for panels and typesetting and Krita for drawing.
I don't really like Photoshop's brush, but it did really well in curbing my perfectionist tendencies, so that's good.
It's also been quite a while since I draw in general (sobs) so... yeah, you might find differences, or not ¯\_(ツ)_/¯ But I hope you enjoy it nonetheless!
I know setting is important, but maaan I genuinely won't miss rereading chapter 83-93 with a heavy focus on background and character locations. I just want to read the action and dialogue😭 However continuity is really important. But my spatial intelligence is almost non-existent even GPS sometimes can't help me. All I'm saying is that if you find some silly drawing mistakes, do forgive me ∠( ᐛ 」∠)_I only drew all this in a week because otherwise I won't have another chance to complete this.
Well, lots of things I won't miss from this project, but haha let's talk about the characters instead because holy shit what was I thinking, starting this year drawing this many characters in the same project??? I have never drawn anyone here except for Yuuji, Gojou, Nanami and Megumi. I don't think I've ever drawn older Getou before. I already forgot how to draw my boy Yuuji and I gotta draw all these people???
This is what you call making a bad decision, kids. Don't do your "drawing warmup" after months of not drawing and tackling a project of a scale way bigger than you've ever tackled before.
Thank you for reading this far! I hope you find my complaint entertaining! But make no mistake, I genuinely still love the fic. Drawing this, even with all the headaches it gave me, only makes me adore this fic even more.
Thank you very much to each one of you who follows and leaves comments and tags on my silly art—it never failed to make my day :D And I sincerely wish this one also made your day or even made your minute! I'll see you in the next part!
#yuu's art#jjk-fic-fanart#jjk-ship#五悠#goyuu#goyu#5u#gojou x yuuji#shibuya arc#shibuya arc canon divergence#lots of characters on this one#kenjaku#chousou#mahito#jogo jjk#gojo satoru
85 notes
·
View notes
Note
hey, can i please ask what dimensions you use to make your header gif? (I THINK you used to have that thing where you have a little circle gif inside the header as well. If you don't mind sharing how to do that I would appreciate it! If you didn't, please disregard haha)
hiiii!! sorry this took me so long lmao but yes! this was my header for a while and i basically had the circle gif act as my icon (so i just hid my icon under edit appearance) so i'll walk you through how to make it!
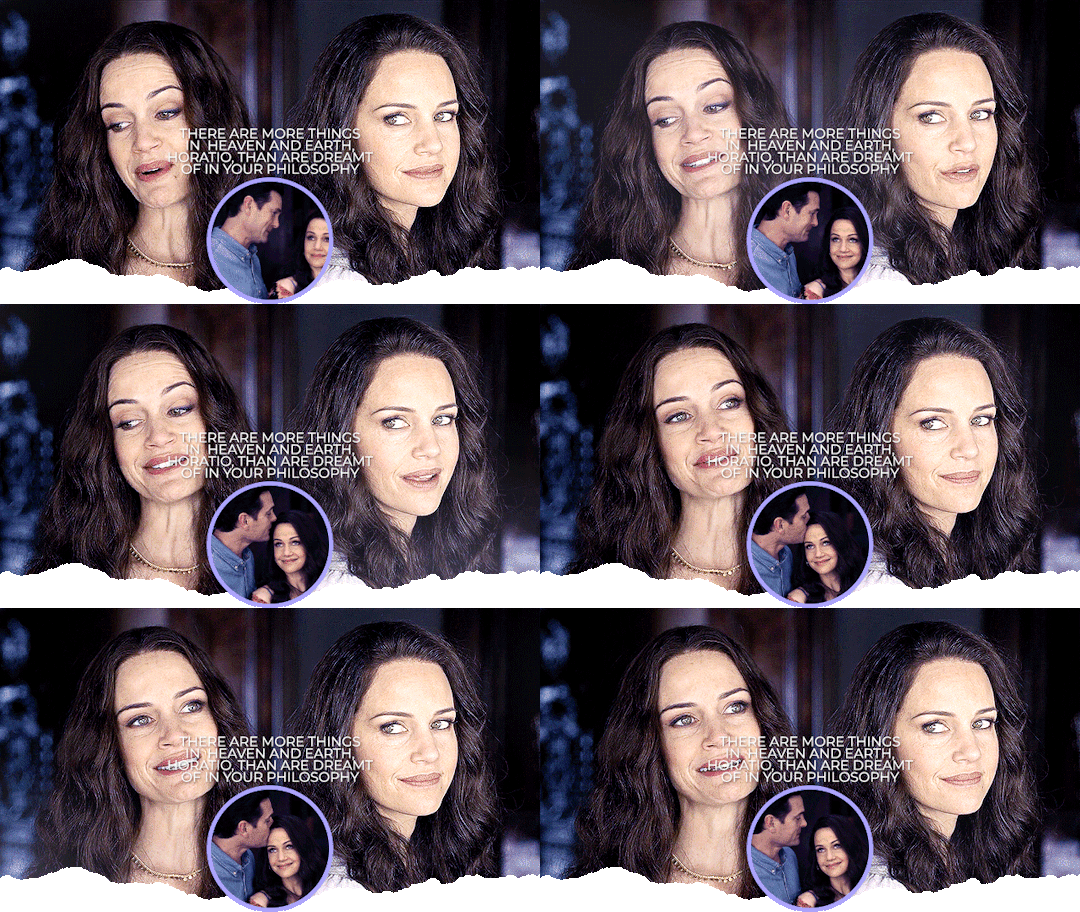
ultimately, the header contains 3 separate gifs: liv on the left, liv on the right, and hugh and liv in the circle. i find it easiest to make the gifs all separately first and then bring them all together on what will become the header's canvas,.
i crop, sharpen, color, and then convert each of the 3 gifs into a smart object and plop them onto the header canvas. the dimensions of this one are 640x360 but i believe the header dimensions have changed and are now 580x326 (that's what my current one is) but idk i never had an issue using the larger dimensions so you can try both out and see what you like best!
the original dimensions for the 3 gifs themselves were: 640x360 for the two large gifs and 368x184 for the circle. the circle gif doesn't matter quite as much, just make sure it's at least a few pixels larger than the circle you create when you get to that step!
so once all 3 gifs are turned into smart objects (if you don't know how to do this, when you're in timeline, highlight all your layers and right-click -> convert to smart object. this just makes the whole gif into one layer and they're easier to work with and adjust as necessary.
when i'm blending gifs together, i like to set the background/first layer of the gif to black. it helps when you're blending and your layer masks get really close together and instead of going to a transparent background, it goes to black and i think it gives it a cleaner look. this really is just personal preference and completely optional though!!
anyway, i brought over the two main liv gifs first and played around with where i wanted each one. this is what i have once i figure out the positioning and set both layers to screen.
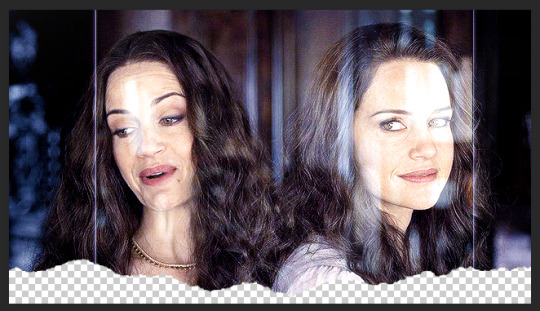
then you want to add a layer mask to each gif. select each layer separately and press this lil guy at the bottom off your layers panel:

when i'm blending, i pretty much exclusively use a soft round brush. size depends on what i'm blending and the dimensions, but hardness is always set to 0%. on a layer mask, you're going to use either black or white. black removes parts of the gif, white will bring them back. it's a very low-stakes way of getting rid of areas you don't want while not having to worry about deleting too much.
once i'm happy with the blending, this is what my layers ended up looking like (with the black layer beneath), but this will vary depending on your gifs and positioning!

the next step is the ripped paper effect at the bottom (if that's the vibe you're going for). you could theoretically do this with any kind of brush. i just like the look of it so it's not such a harsh transition on my mobile theme from the header to the background color.
these are the brushes i use but i'm sure you can google something to the effect of "ripped/torn paper brush photoshop" and find plenty others.
go ahead and group both of your gifs, your base layer, and any other coloring layers if you didn't color them before transferring them to this canvas. to do this, select all applicable layers and press ctrl+g or right-click -> group from layers.
now select the group and add a layer mask the same way we did with the gifs using the little icon at the bottom of your layers panel. your layers should look like this now:

once your brushes are loaded into photoshop, open up the brush tool by pressing 'b' and select the brush you want to use. i usually try a few different ones out just to see the different edges. you may have to adjust the brush size and make sure the hardness is set to 100% if applicable. before using the brush, make sure the layer mask itself is selected like in the above screenshot and your color is set to black.
when you hover over the canvas with your selected brush, you'll be able to see where the top edge will rest. i keep mine pretty close to the bottom -- i think the highest up this particular one goes is about 50px from the bottom. you should end up with this:
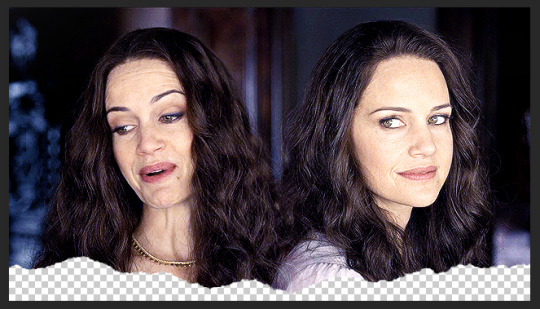
onto the circle/icon!! i truly just ended up eyeballing this size-wise. go ahead and call up the ellipse shape tool. to do this, right click on the shape tool and select ellipse like so:
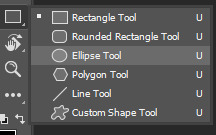
colors are totally up to you, but i like my shit color-coordinated so i believe i color picked the bottom circle (the outline) from liv's purple dress in the right gif. once you have the ellipse shape tool equipped, click anywhere on your canvas. the dimensions i used were 150x150 but of course feel free to experiment. for a perfect circle, both numbers do need to be the same.
using ctrl+t (the transform tool) drag the circle to the vertical center of your gif and right to the very bottom so it's hanging over into the transparent part. this is what will make it look like your actual icon on your mobile theme.
next, create another circle. i'd recommend using black for this one, but it really doesn't matter. the dimensions for this one are 140x140 (10px less than your outline circle), but again, this will vary depending on the outline dimensions. i liked the thickness of a 10px difference, but you can always increase or decrease that depending on your preference. this circle is going to be the base for your icon gif.
again, use ctrl+t to vertically center your circle and bring it all the way to the bottom just like you did with the outline circle. as long as they're placed/snapped to the exact same location, you'll have a perfectly consistent outline.
go ahead and bring over your icon gif, already sharpened, colored, and converted to a smart object. make sure this layer is directly above your black circle. on your gif layer, right-click -> create clipping mask. ctrl+t to move it to the same location as the circles and adjust it to your liking.
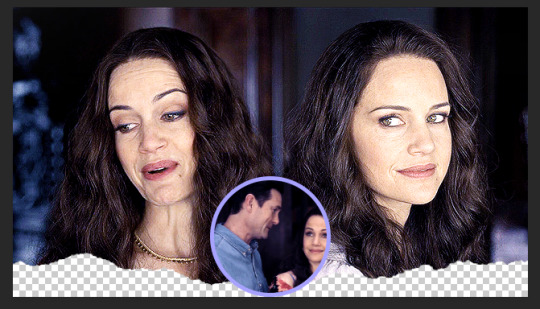
of course, it's completely up to you if you want to add text or overlays or not, but i figured i'd share what i did in case you're curious! (click to enlarge)
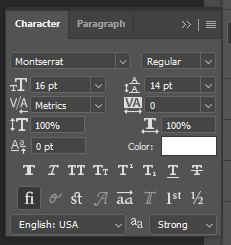
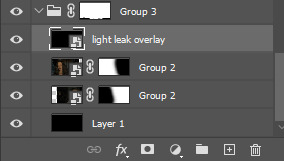
and for the overlay, i just grabbed a video off youtube of different light leaks. i only wanted it to be on the two main gifs and not the icon gif, so i plopped it into that group we made and put it at the top, over everything else, and set it to screen like so:
and that's pretty much it! if you have any questions about the tutorial (or anything else) just let me know!! i'm more than happy to help 🥰
#answered#gracegordongreene#my tutorials#gif tutorial#gifmakerresource#chaoticresources#completeresources#dailyresources
78 notes
·
View notes
Note
These people need to be studied, they use disgusting vocabulary towards a person they claim they don't care about, see things in very bizarre ways, twists every piece of info they find, or invent shit, and when someone tries to reason with them, they call them delusional? Projecting too much maybe...
Listen, I'm the first to admit that Natalie might not be my favorite person, not because she is dating Henry cuz he isn't my favorite person either, just because there are certain things that might be sketchy, but they are in a totally different level of crazy fans, even when they say they are not fans. I was in the fandom for a while when things were just drama between fans, nothing like this, I truly don't know what this is, cuz the level of hate, and the obsession these people have all while claiming they don't spend all day thinking about this topic and you see them creating new blogs, posting post after post with the most crazy ideas, and still think they are right, that they are the voice of reason, I guess it is a glimpse of how the world is lately, really sad.
Does she have to be anyone’s favourite person? No. Does anyone have to like her? Also no. Which is fine and normal. Is she sketchy? Sure why not? Is everyone else sketchy? Absolutely. Is she a human being that makes mistakes? Yeah. That’s what people are all about. At some point even those who commit crimes can be rehabilitated into society again. There’s a saying “people judge you by your sin God judges you by your repentance”. I wish these women would sit down and think long and hard if they started dating Henry Cavill now how would this fandom feel about them? What sketchy things they have done in the past? Is there a nude they have sent? Do they have a problematic mom,cousin uncle? What Halloween costume were they wearing in 2003? Do they think fandom would love them? Accept them? Hardly doubt it. The reason is simple- she would be a woman that got “their man”. Even if she has a doctorate in political science,if she owns her business,runs an animal sanctuary,is incredibly beautiful by all standards, was nominated for a Nobel peace prize women in this fandom would pronounce her evil 😂. At the end of the day everyone is bad except for his “loyal fans” haha and this is our first day on Earth.
I think the funniest thing for me is them trying so hard to disprove facts that Henry and Natalie are having their careers respectively ,that they’re dating ,and that they have a child. So they invented “jobless Natalie and Henry that lost his career and his fans”/ “pr contract”/ “fake pregnancy” to the point that Henry is lying and photoshopping himself 😂😂😂.
Just a reminder that the same person that started the whole PR BS did the same thing for Henry’s ex Lucy Cork (check LucyCork1980 on Instagram). Fascinating that you can copy paste everything from that page to every troll account today.
#henry cavill#natalie viscuso#this is bullshit#spilling the tea#celebrity#celebrity gossip#henry cavill superman#trolls#hollywood#delusional people#hollywood gossips
13 notes
·
View notes
Note
Hello there!
I'd like to know your advice on drawing tablets?
As in, what do you use for your digital art? Is there any you suggest?
I'm planning on getting one, but there are so many options, and I'd like to know your opinion and preference.
Thank you ^^
hi anon! thanks for the question!
i draw with a samsung galaxy tab s7!
BUT if this is your first time drawing digitally, then it's a good idea to test out if you like it with cheaper options first (so you don't drop a whole lot of money on a hobby/medium of art you don't enjoy)
some suggestions:
if you have a smart phone, try drawing with your finger using free to use drawing apps like ibispaint X or HiPaint (i recommend HiPaint cuz the UI is a lot simpler and less overwhelming, but both have a good selection of tools. i wanna say ibispaint has better text tools tho and there's A LOT more tutorials and resources online) drawing digitally with your finger is different from drawing digitally with a pen AND drawing traditionally, but this is a good way to familiarize yourself with digital art tools. a very simple entry point if you already have a smart phone.
if you don't want to draw with your finger (understandable, i personally couldn't stand it) you can try simple drawing tablets, which are the tablets that you plug into your computer/laptop, come with a pen, but they don't have a screen you draw directly on. they're actually a lot more affordable nowadays (i saw some for under $50 CAD, which is WILD), so that’s a good starting option if you want to draw with a pen. with a pen, you have more control with line weights than you do with your finger, but it takes practice to get used to. it also takes some getting use to drawing on a tablet and looking at your monitor, but this is where i started haha. i still have my old bamboo wacom create drawing tablet. but nowadays, other brands like xp-pen and huion are very comparable to wacom, so definitely consider getting a cheaper one to try out first. of course, if you go with a drawing tablet, you'll need an art program on your computer. i've used photoshop and clip studio paint and they're very good, but probably overwhelming for people who are new to digital art (they are loaded with tools and you have to really familiarize yourself with the menus and everything). there are probably simpler options available... but i'm not as familiar with them. oh wait, i think there are some drawing tablets that can also connect with your smart phone too nowadays. man, that's so cool. that's probably a better option instead of purchasing photoshop or clip studio paint right off the bat.
if you REALLY want a screen display experience, try a cheaper general tablet. iPads are a popular option if you're comfortable with the Apple ecosystem (i'm not 😅) but they can be pricey PLUS you have to buy the Apple pen separately. for Android, I'm pretty sure even the Samsung Galaxy Tab S6 is a solid choice and it comes with a pen unlike an iPad. the SPen is built with Wacom tech, so you know it's quality. and while iPad has Procreate, HiPaint is available for Android and it's basically a Procreate clone (i explain more about HiPaint here) otherwise, ibisPaint X is also good and infinite painter is probably the most sophisticated free to use drawing app i've encountered (sophisticated as in it does a pretty good job at imitating traditional media in their brushes. it's cool, but the free version is very limited).
also if you like watching videos, Brad Colbow and Teoh on Tech on YouTube are great resources. they specifically review tech from an artist's perspective.
why i suggest testing it out is because if you're used to drawing traditionally, then switching to digital is a different experience. some artists can't get used to drawing digitally, and that's fine. that's why it's a good idea to test it out with a cheaper option first to see if you like it and to give yourself time to familiarize yourself with drawing apps/programs. i actually kinda hated drawing digitally at first. i didn't have the same level of control that i was used to with drawing traditionally. and overtime i made a lot of bad habits with my digital art that i had to unlearn by switching back to traditional art for a couple years (some bad habits like: relying on the Undo button to make "perfect" lines; trying to draw really fast because the pen glides over the screen unlike a pencil has friction against paper) so... give it a try and just let yourself have fun. don't worry about making anything perfect, just have fun!
#ask the crab#i hope you have fun!#i first got my bamboo wacom tablet in 2011#and it's still very good#i use my samsung tablet now because i really like the screen display experience#and the fact i can bring it with me on the go without my laptop#i like digital art#but i'll still occasionally switch to traditional art#that's how i deal with art block#i switch something up and just experiment with a different medium for a little while#that gets me out of the perfectionist mindset too#i can't spam the undo button if there's no undo button with pen and paper#the reason why i switched to digital art recently was because i was struggling with sketching with traditional art a little while back#i was designing a new DCA OC with a body type i am not familiar with drawing#and it was just getting frustrating trying to get the body shape right#so i took a break and switched to drawing chibis in digital art so i could give myself a refresh#i eventually was able to design that character#but i did it digitally#i'll share him soon#i haven't really decided on an outfit for him yet
22 notes
·
View notes
Text
my natal chart & heterochromia theory
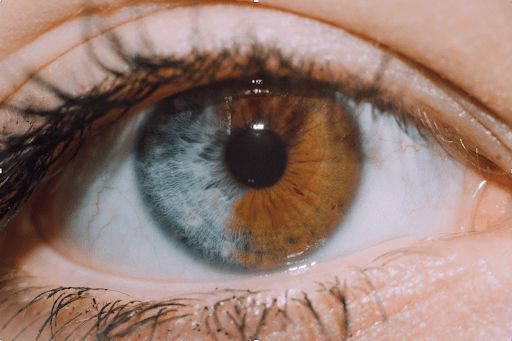
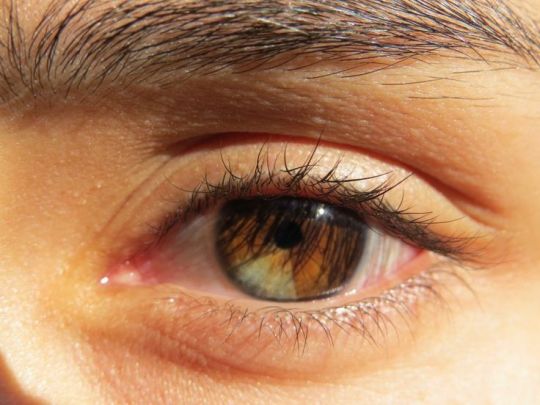
firstly, I would like to emphasize that this is only a hypothesis of mine and it needs a lot more evidence to support it.
despite heterochromia being a rare phenomenon, I happen to know two people who have it - my mother and my best friend. both of them have Sagittarius Sun, but I think this is just a coincidence. because of this, I became interested in some patterns that could potentially indicate different eye colors.
it's also important to note that here I consider cases of full or partial coloration as "heterochromia". I don't include situations where people have slightly noticeable tone differences or perhaps color veins. also here I'm speaking about genetic heterochromia, not acquired one.
there are many different approaches to the question of identifying the significator of the eyes in astrology. some people say that the Sun represents the right eye for men and the Moon represents the left eye, while the opposite is true for women. some people mention Saturn and Venus.
however, I have a different theory.
in medical astrology the head and eyes in particular are associated with Aries. therefore, I believe that we need to deal with Mars. I also consider the Sun, as its exaltation is in Aries as well.
to summarize. according to my hypothesis, we have Aries, Mars, and the Sun responsible for the eyes.
next, we need to identify the possible reasons of "corruption". my assumption is as follows:
1. Chiron, as it refers to oxymoron and contradiction of opposites.
2. Uranus, as it refers to something unexpected and strange.
3. Lilith, as it can provide some specific features, but only if it's involved in some significant and accurate aspects or placed in the 1st house.
we are now done with the theoretical part. then, I analyzed the natal charts of various celebrities with heterochromia. here are some observations:
`1. Kate Bosworth
damn, her Capricorn Sun, Venus and Lilith… so old-money cored appearance, I admire. her Aquarius Mars in square with Taurus Chiron is interesting, because Air Mars often gives blue/grey eyes, but we have a brown (earth) sector in this case...

2. Josh Henderson
honestly, his heterochromia is a little bit questionable for me and it took me around 20 minutes to observe it in his photos and videos. in some photos and videos, his eyes have the same grey/light blue color, while in others, he has such a green eye that I even wondered if it was Photoshop. however, according to the Internet, he was born with this trait, so we can consider it a common knowledge. his Virgo Mars is squared with Sagittarius Lilith and Scorpio Uranus, and there is also a conjunction between Lilith and Uranus.

3. Alice Eve
another beauty with Capricorn Venus, I begin to think that I have something personal with them… in this case, the situation is more clear. we have an active Aquarius Sun in square with Taurus Chiron (once again). additionally, her Sagittarius Lilith forms sextiles with the Sun and Libra Mars.

4. Jane Seymour
do any James Bond fans out there? because next we have actress who played his love interest. another Aquarius Sun - Capricorn Chiron sextile, + Pisces Mars square Gemini Lilith. her light eye, by the way, have a slight green accent. maybe it's because of the Pisces influence...

5. Mila Kunis
she was so good in "Black Swan"! there is really something magnetic in her appearance. Leo Mars sextile Gemini Chiron. additional influence of Leo Sun-Aquarius Lilith.

6. Dominic Sherwood
another Sun Aquarius. probably it also has some effect... Capricorn Mars-Uranus conjunction. it's secondary, but Cancer Chiron has a trine Scorpio Lilith and opposition with his Uranus.

7. Henry Cavill
the sexiest Superman in the house (however, he is absolutely not my type, haha). conjunction of Mars and Chiron in Taurus. that's all for him but this was enough for his heterochromia.

8. Svetlana Ivanova
omg, I'm obsessed with here face. the combination of Libra Sun and Virgo Venus makes her images so... pure, angelic? her Virgo Mars is squared by Gemini Chiron and Sagittarius Uranus. + Mars sextile with Taurus Lilith.

9. Elizabeth Berkley
fire combo. Aries Chiron in a trine with Leo Mars. Mars is also squared by Scorpio Lilith. and, finally, there is also a sextile between Mars and Libra Uranus.

last random fun fact about celebrities:
I also had Sarah McDaniel on my list of celebrities with heterochromia. she has such a unique difference - one eye is completely brown and one is completely blue. but when I checked her chart I find nothing. I was puzzled and at one point, I thought about giving up on writing this post. but then, I decided to do some more research about her. and surprise-surprise - her father revealed the truth by showing a childhood photo of her with both eyes the same brown color.
as for my mother, she has Sagittarius Sun sextile Aquarius Lilith & Scorpio Uranus. her Aries Chiron has no aspects to Mars, BUT it squares her 1st house Saturn. her eyes are green, but a half of one eye is blue. my best friend has 1st house Sagittarius Sun-Lilith conjunction, Sagittarius Chiron-ASC conjunction and Aquarius Mars-Uranus conjunction. her eyes are similar to Kate Bosworth's - light-blue/grey with brown part. that's why I can add that the connection of Chiron/Uranus and sometimes Lilith with the 1st house, ASC in particular or even the ruler of the 1st house also makes sense! (don't forget that Aries is the symbolic ruler of the 1st house). it's hard to trace it in celebrities' charts as I don't have information about when they were born, but I guess it's possible to find this connection either.
that's how it is. huh, it was hard to write and search. Thank you for reading!
I would also appreciate if you could share your thoughts on this topic. Perhaps you or someone you know has heterochromia, and could provide more evidence to support or deny my theory.
Pictures credits: Pinterest
#astrology tumblr#astro observations#astrology#astro notes#astro community#astrology placements#astrology thoughts
27 notes
·
View notes
Text
BEHIND THE SCENES!
Only because I don't see enough posts like this and I think they're neat so logically at least one other person will think they're neat! This isn't a tutorial or anything just "here's what you didn't see me struggle bus through" THERE WAS SOME STRUGGLE! LOL


This man's mouth...... Around 7 hours of of work went into his face and mouth. But please don't mistake that for some kind of brag - it's literally because I'm so out of practice and unfamiliar with the face bones! Getting the lips "just right" is....ugh.

The ACTUAL shoulder used vs. the crunchy hidden shoulder. I fake stuff like this all the time. MAYBE if he'd been either shirtless or wearing something with detachable pauldrons this would've been fine, but I REALLY needed him to be wearing that armor.

In total 18 layers went into making the saliva. Part is cut up and re-assembled from a (paid) stock photo, part is hand drawn. It's so small on the image that it comes down to counting pixels. 5 may belong to a cut from the stock image but 2 were added haha. This was so tricky because the major difference between saliva and "other bodily fluids that might drip off a tongue like this" (eyebrow waggle) is that saliva is clear and tends to be bubbly. So I was REALLY going out of my way.

Actual size snip of the (paid) stock photo I was using. So this was HILARIOUSLY high res for what I was using it for. This was the part I really started laughing. I went to design school for this. I have a degree. And what am I doing? I'm carefully photoshopping spit bubbles onto Elezen.
#gposers#gpose shenanigans#gpose behind the scenes#lifting that glamorous gpose veil#the struggle bus was real#half of it self-inflicted because I'm not familiar enough with certain bones#The saliva thing was all my doing though#I have to be on a plane in less than 10 hours#and what was I doing#photoshopping spit bubbles#instead of packing#hopefully this was entertaining#and showed that GPOSE can be an absolute mess behind the scenes#and that's fun and totally fine
10 notes
·
View notes
Note
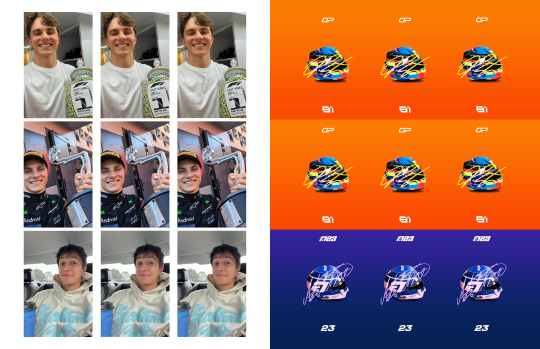
love your f1 photo cards that’s so fun!! can i ask how you make them?
wahhhh thank u i appreciate it !!! :') it's certainly much cheaper than engaging in Real photocard shenanigans... making them is pretty simple but it does have a few steps so apologies for the incoming overexplanation hkldsfh T__T
i set up 2 files for the front + back side on standard letter paper (or w/e you use in your country; the pcs themselves are 5.5cm x 8.5cm so i do 3x3 on each page!). also a reminder that the order is mirrored horizontally so you need to match the front left-most image with back right-most image & vice versa...
print them out normally; my printer doesn't have double-sided printing so i just print one side a time LOL
use self-adhesive laminate sheets to laminate both sides!!! this isn't necessary but it really helps out the texture and look imo
cut them out however you like, i use a super cheap paper cutter to make my life easier haha
andddd finally i just use the 4mm side of a corner punch to get the rounded corners :') that's basically it!
for ref here's how my files are set up... i like to leave a lot of bleed space on the back just in case the print isn't perfectly aligned but i don't think it's super necessary tbh. Actually it's kind of a waste of ink now that i'm thinking about it so maybe don't do that LOL 😭 and the back designs are just really simple photoshop so nothing special there hlsdfhk but... yes i hope that helps! 🧡
15 notes
·
View notes
Text
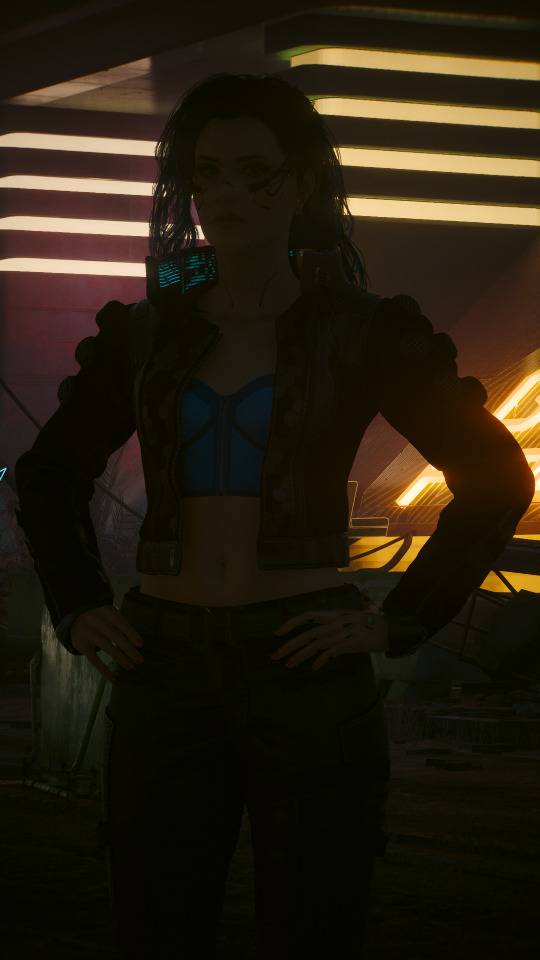


I saw someone recently ask why their shots weren't turning out how they wanted them to despite being able to support the highest graphical settings, so I thought I could share a little behind-the-scenes tidbit re: my approach to lighting and post-editing in VP in case it's useful.
And for my money, lighting is one of the most important factors in getting a shot that I'm happy with. Yes, a high-end graphics card can absolutely help, but that's just one tool of many that can make a difference.
(This info is probably most relevant to folks who can mod their game, but the overall principle can also be applied to vanilla photomode, too. You'll just have to find good in-game light sources since you won't be able to spawn your own, and it might require a little more finagling with the vanilla photomode exposure and contrast settings. Here are some 100% vanilla shots I took recently that I think turned out pretty decent even with those limitations, just to give you some ideas if that's what you're working with.)
Lighting & Exposure
So referencing the photos above, from left to right:
A purely vanilla shot with ray-trace enabled but no lighting tools
The same shot with lighting tools on Valerie
The same shot with lighting tools + some Lightroom editing
Beefy graphics cards can certainly make a difference here since they'll be able to render more nuanced light and shadows, but as you can see in the purely vanilla shot, that ray tracing on its own ain't doing much when it comes to lighting Valerie. The neon lights in the background are pretty, but she's barely even visible in that dark ass street.
In the second shot, Valerie is in the exact same location but has multiple light sources on her. I mostly use CharLi lights these days, which is a free suite of lighting tools available on Nexus, and the customizable ambient lights in AMM, also free on Nexus.
I didn't think to screencap my exact lighting setup, but I'm pretty sure it was something like this:
CharLi spotlight on the left and right of Valerie, tinted pink/magenta
CharLi spotlight on the upper right, tinted teal
(I think I might have had an orange CharLi spotlight too, but it wasn't visible from this angle)
2 CharLi white spotlights directly on Valerie
Probably 1 or 2 AMM customizable point lights on her face (I like using the point lights at very low brightness to accentuate faces and give them a nice glow)
Now putting all these lights on a character could end up way too bright at the default vanilla exposure, especially if you aren't using any kind of major Reshade overhaul (which I do not).
Instead, I just use the vanilla photomode exposure settings to make a scene really dark and then light it back up with my own tools. (This is also a great way to shoot in areas that might have weird lighting effects, and it can be done indoors or outdoors and at all hours of the day.)
Just a simple example of that in these shots:

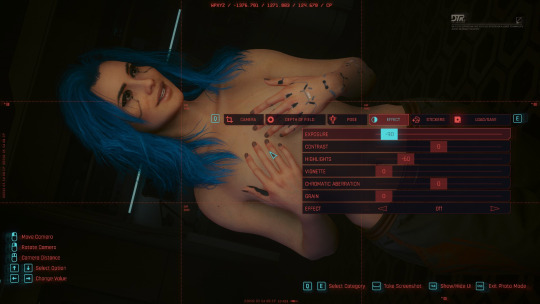
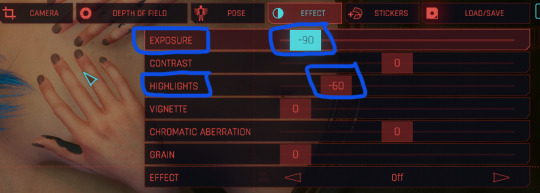
On the left, Valerie has a spotlight on her face and chest--It's pretty bright, too bright for my tastes. On the right, she has the same spotlight, but the overall exposure has been dropped down to -90 and the highlights have been dropped to -60 (now it's a little too dark for my taste--If this was gonna be a real shot, I'd build up more lights, but just wanted to show how much altering the exposure can affect a shot).
Post-Editing
As for making further adjustments to colors, shadow levels, sharpness, etc. of a shot, I know a lot of folks prefer to do that with Reshade presets, but... I don't, haha. I did make a basic shader to reduce the green tint of the game, and I use the Cinematic DOF and Real Long Exposure shaders to get a nice depth of field and reduce hair pixelating. Otherwise, all other adjustments I make are in Adobe Lightroom (or Photoshop if I need to make more precise adjustments).
And it's just a personal preference here. I just don't like having to mess with too many mods and menus in-game--I feel like it increases the chance of something freezing or crashing or me accidentally closing out of photomode. It also helps to give me a new perspective to see the shot outside of the game, especially if it's a portrait-oriented shot. Plus, I just like the process. Gives me one more reason to stare at the blorbos for a little while. :3
I adjust each Lightroom preset as needed depending on the color and exposure of the shots I'm working with, but these are some of the more common settings I modify:
I almost always finetune the exposure and shadows/highlights.
I like to do a global increase for saturation and vibrance.
A lot of my presets increase the saturation of reds and blues and decrease the saturation of yellows and greens, but this can vary; e.g. i like the greens to be vibrant if it's a nature shot.
I also usually make the white balance a little cooler.
I love tinkering with the global curves settings to "flatten" the shadow levels.
And I like really crispy shots, so I always increase the sharpness, and I'll usually bump the texture and add some noise, too.
These are all things that can be done in other similar programs/apps or even with Reshade. If you're just starting out, I think using pre-made presets and filters is a great way to go, and as you get more comfortable with the tools, you can start to make little tweaks and edits to personalize the style.
So anyway, there's some of my process! Everyone's got their own, and what works for me might not work for you--Don't feel like you have to take any of this as gospel or work exactly the way I do. But maybe this will... shed some light (ha ha, I'll see myself out) on how to get started with some VP tools. <3
43 notes
·
View notes
Note
I know it was months but, but the "Weirdly Specific Artist Ask Game", if you're still interested in answering; 1) Art programs you have but don't use 2) Is it easier to draw someone facing left or right (or forward even) 5) Estimate of how much of your art you post online vs. the art you keep for yourself and 8) What's an old project idea that you've lost interest in
O hello there! I still love this game so I will defo still answer 👀
1. Photoshop and Clip Studio.
I tried. I bought a whole new desktop PC to learn those damn programs *weeps* I still haven't given up hope. But in comparison to how light weight and intuitive procreate on the iPad is, those programs really quickly overwhelm and confuse my poor brain.
2. Depends on the day honestly. If I get to use the symmetry tool then forward no contest. But I would say facing left if I had to choose.
5. I actually post a fair amount of my stuff. I used to have a real issue finishing work or sketching w out fully rendering so I would put stuff out either slow or messier than I would have liked to share. But these days I'm actually having a lot of fun with lines and flats and it's made drawing quicker and easier if I'm just trying to get an idea down (huevember). I'm always hungry for that sweet sweet validation haha.
It's actually deciding what to draw that factors a little more for this question. I have a bad habit where I get self conscious of the subject matter I draw not appealing to my audience. If I think I can't post it and have it do well I tend not to be able to get inspired to draw it. Which is a real shame! And something I would like to work on changing!
8. Oh God how could I even narrow it down. I have the attention span of a goldfish. Looks at my fandom graveyard guiltily.
I thought of doing tarot cards for my OCS once. Like, the whole deck cuz I have so many. Yeah. No. That didn't happen.
Thank you so much for these questions! I always love hearing from y'all 😊💕
21 notes
·
View notes
Note
Firstly, your Cyberpunk photography is fucking incredible. I love your characters and- as a side note away from my main question- absolutely need to know what mod you used for your V’s long hair. Plus seeing Kerry content is automatically a A in my book because he’s just the best character- what can I say? Anyways, I’m sure it’s been asked hundreds of times- but, how do you manage to get your photography’s so… perfect? I have a pretty beefy PC and run CP on the highest graphics but both with and without mods all my pictures always look so blurry and terrible- specifically around the faces. I’d love to know how you get them so clear and beautiful plus any tips and recommendations on your posing/composition.
This is so kind, thank you so much omg. Your message just made my week <3
For your first question, you can find the hair here!
As for my shots... Honestly it's mostly just me balling it haha. Mine used to be very blurry too but I can't for the life of me remember my settings when that happened, but I do know Path Tracing makes stuff look weird for me even tho my video card should be able to handle it. In general, ray tracing is always off for me, and I have Resolution Scaling on DLSS quality priority with max graphic settings (except for clouds, those are on medium(if that even matters)). Once in photomode tho, it's just a bunch of messing around and see what works. Most of the time I first press space for a quick render to fix the lighting/shadows, then I start messing with the exposure/contrast/filters a bit to enhance the colors of the overall composition, and sometimes I throw on a reshade that compliments the vanilla look further. My general FOV is around 20-30 with 70-80 on DOF cause I feel that makes the overall shot look most crisp and if necessary I'll clean up a bit in photoshop afterwards, but most of the time i just use it to slap on a filter and some grain and call it a day.

After I throw it into photoshop, the end result would be something like this:

As for tips on posing/composition; first and foremost, in-game lighting is your best friend. There are plenty of spots with neon signs and spotlights that give great lighting. If I found a great spot but aren't too sure about the lighting, I also tend to mess around with AMM and adjust the time of day for better (or no) sunlight. Or you found the perfect spot but the lighting is just a bit off? Spawn some spotlights or area lights with AMM to enhance your models! I usually just roam around, find a spot I like as background, and then go from there with setting up an outfit/color scheme/pose. Most of it for me really is just throwing shit at the screen and seeing what sticks tbh. I do use the photomode grid a bit especially for 16:9 shots to align my models a bit off-center cause that just looks better to me personally.

And that's all I can really think of right now.. Sorry if it's not much of a help or all over the place, I'm currently sick and my brain isn't functioning too well lmao. If you have any more questions, don't be afraid to ask! I'm more than happy to answer!
#ask#cyberpunk photomode#praying this answers your question#brain fog is severe rn hahaha#but thank you again for the kind words!!! ;w;
3 notes
·
View notes